|           HOME           |           RECIPES           |           TIPS & TRICKS           |          

Showing posts with label appetizer. Show all posts

Monday, August 25, 2014

Dipping Oil

Back in Massachusetts, there's a restaurant chain called Bertucci's and their food is delicious. Lucky for me, there's one right next to the bridal store I purchased from when I got married. So every time we had to go there (picking out my dress, picking out bridesmaid dresses, alterations, etc.) we would eat at Bertucci's! The best part of going there is the freshly made rolls with their amazing dipping oil. I decided to try to recreate it. I have to say, mine might actually be even better. How do ya like that?! haha


Dipping Oil
Makes: 4 servings

2 cloves garlic
1 tsp fresh basil
1 tsp fresh parsley
1 tsp fresh thyme
1 tsp fresh rosemary
1/4 tsp crushed red pepper flakes
1 tbsp grated Parmesan
1/2 cup extra virgin olive oil
pinch of salt

  • Mince the garlic, then crush it with the side of your knife until you have a fine paste. If you're not sure what I mean by this, check out this video.
  • Mince the basil, parsley, thyme, and rosemary.
  • Combine the garlic, herbs, pepper flakes, Parmesan, olive oil, and salt.
  • Serve with sliced crusty bread or rolls for dipping.


Have some extra dipping oil left over? Toss it with some hot pasta and top with diced tomatoes!


...or you can use it as a marinade for chicken, seafood, or vegetables!


Sunday, August 17, 2014

"Un-fried" Squash

As I mentioned in my Fried Squash post, southerners love their fried squash. It can be breaded or battered. But... since we're trying to be healthy here, I decided to try an un-fried version! I think it tastes just as good as the fried version! In fact, it was so good I didn't feel like it needed any kind of dipping sauce. It was delicious on its own.

"Un-fried" Squash
Makes: 4 servings

2 summer squash
1/2 cup canola oil
2 cloves garlic, minced
1 tsp dried Italian herbs
1/2 tsp crushed red pepper flakes
1/2 tsp sea salt
  • Rinse the summer squash and pat them dry. Cut the squash into 1/2" circles. Set aside.
  • Make the marinade by mixing together the canola oil, garlic, herbs, pepper flakes, and salt.
  • Add the squash and marinade to a gallon size plastic bag, then toss to coat the squash. Marinate in the refrigerator for at least 1 hour.
  • Remove the squash from the marinade and grill on high for 2 minutes per side.
  • Serve as an appetizer or as a side dish.

Fried Squash

Fried squash is another southern treat that I was sadly deprived of until I moved to Charlotte. Apparently it's a big deal around here. Southerners love their fried squash. Almost as much as fried pickles haha! I've seen some people use a batter on their squash and some people bread it. I like it both ways, but today I decided to bread it. And... since it's swim suit season, I'll decided to try my hand at some "Un-fried" Squash. They both came out excellent if I do say so myself!


Fried Squash
Makes: 4 servings

2 medium summer squash
2 cups plain bread crumbs
1/2 tsp sea salt
1/2 tsp garlic powder
1 tsp dried Italian herb mix
1/4 tsp cayenne pepper
2/3 cup flour
4 eggs
1/4 cup milk
canola oil for frying


  • Fill a stainless steel fry pan with 1" of oil and preheat over medium-medium-high.
  • Rinse the summer squash and pat them dry. Then cut them into 1/4" slices. Set aside.
  • Mix together the bread crumbs, salt, garlic, herbs, and cayenne pepper.
  • In a separate bowl, whisk together the eggs and milk.
  • Dip the squash into the flour, then the egg mixture, then the bread crumb mixture.
  • Once all of the slices of squash are coated in bread crumbs, lay them out in a single layer on a plate and allow to sit for at least 5 minutes. This will allow the breading to harden a little bit and prevent cracking when you fry it.
  • Fry the squash in batches, making sure not to overcrowd the pan. Once the squash is golden brown, about 3 - 4 minutes per side, remove from the oil and allow to drain.
  • Serve with dipping sauce such as marinara.

Thursday, August 14, 2014

Three Olive Tapenade

I just love olives. They're so salty and pungent. Yum! Olive tapenade is the perfect snack for olive lovers. It's a mix of finely chopped olives with some other yummy flavorings. For this particular recipe, I kept it pretty simple because I wanted the olives to be the star of the show. But I've seen some other recipes that include capers, anchovies, or roasted red peppers. Feel free to play around with it and add your own spin!


Three Olive Tapenade
Makes: 8 servings

1 1/2 cups black olives
1/2 cup kalamata olives
1/2 cup green olives with pimiento
2 cloves garlic, minced
1/4 cup extra virgin olive oil
2 tbsp fresh parsley, chopped

  • Combine all of the ingredients into a food processor. Pulse until the mixture is finely chopped.
  • If you prefer a smoother texture, continue to puree for 2 minutes, periodically scraping down the sides.
  • Serve at room temperature or cold.
  • Serve on crostini (toasted bread rubbed with garlic) or with veggies. You can even spread it on some chicken breast then bake in the oven!

Tuesday, August 12, 2014

White Bean Salad

I don't think white bean salad gets nearly enough credit for how delicious it really is. Some might think of it as old fashioned or boring. But I beg to differ. White bean salad is a delicious appetizer that can be served on crostini (toasted bread rubbed with garlic) or on individual spoons as pictured here. The latter is an impressive presentation and makes it a great "grab and go" appetizer for a party.

White Bean Salad
Makes: 4 servings

15 oz can of white beans (also called northern beans)
1 tsp lemon juice
1 tsp rice vinegar
1 tbsp olive oil
2 tbsp red onion, minced
1 tbsp parsley, chopped
1 tbsp chives, chopped
pinch sea salt
  • Drain the beans well, but don't rinse them.
  • Combine all of the ingredients and mix well.
  • Serve at room temperature or cold.
Note: this recipe tastes even better when refrigerated overnight. This is true with pretty much any recipe that includes raw garlic, onions, scallions, or the like.

Friday, July 18, 2014

Bruschetta

At this point, I think everyone has heard of bruschetta. It's one of those foods that has really picked up in popularity over the last decade or so. In its simplest form, bruschetta is made of diced tomatoes, minced garlic, basil, olive oil, and salt. That's it. You might see some folks make it their own by adding something special like red wine vinegar, scallions, or something else. But sometimes I really like the classic. Just very basic - and delicious - flavors.

Bruschetta is usually served on top of crostini. That's just a piece of toasted bread, usually with some garlic rubbed on there. Crostini can be served with all kinds of great toppings including bruschetta, olive tapanade, or other meats, cheeses, and vegetables.


 Bruschetta
Makes: 4 servings

4 ripe tomatoes, cut into a 1/2" dice
2 cloves garlic, very finely minced
1 tbsp fresh basil, minced
1/4 cup extra virgin olive oil
1/4 tsp sea salt

Crostini:
1 baguette, ciabatta, or other crusty bread
1/4 cup olive oil
2 cloves garlic

  • Make the crostini by slicing the bread on a bias (that means at an angle). Toast the bread pieces either on a grill or under a broiler.
  • Remove the bread from the heat, immediately rub each piece with the garlic while the bread is still hot. Then brush with a small amount of the olive oil.
  • Now make the bruschetta. Mix together the tomatoes, garlic, basil, olive oil, and salt.
  • Serve the bruschetta on the crostini pieces right before serving. If you do this too early, the bread with get soggy.
Some people like to serve their bruschetta with a little sprinkle of shredded parmesan or asiago cheese. I'm a firm believer that not everything can be improved with the addition of cheese. I think this recipe is just the right balance of flavors as is. That being said, if you're a cheese fiend, go ahead and sprinkle some on there.

Bruschetta can also be used to top a piece of grilled chicken or fish or even mixed in with some hot pasta. Go ahead and get creative!

I was so excited to use the fresh tomatoes and basil from my container garden in this recipe. It stinks living in an apartment sometimes but I won't let that stop me from growing fresh veggies!

Monday, June 23, 2014

Baba Ganoush


I made some grilled egg plant for dinner which turned out really yummy. But I had a bunch left over and I wasn't really sure what to do with it. After some thought, I settled on Baba Ganoush. This is another yummy treat that I learned how to make when I was working at the country club. It's a dip made from roasted egg plant, garlic, and sesame tahini and it is delicious! If you love hummus, you will probably love this too!

I'll give you the instructions for how to make this with grilled eggplant since that's what I had on hand. But if you don't want to go through the extra work of grilling it, you can just cut the egg plant in half and roast it in the oven until it is golden brown and soft then scoop out the soft center.


Baba Ganoush
Makes: 4 servings

1 large eggplant
1/2 cup canola oil
2 cloves garlic, minced
1 tsp sea salt
1 tsp cracked black pepper
1/4 cup sesame tahini
2 tbsp lemon juice
salt

  • Wash the eggplant then slice it into 1/2" slices all the way down.
  • Make the marinade by mixing together the oil, garlic, salt, and pepper.
  • In a plastic bag, toss together the eggplant with the marinade. Allow the eggplant to soak for at least 30 minutes before cooking.
  • Preheat the grill on high. Once hot, place the slices on the grill and cook for about 3 - 4 minutes per side.
  • Place the eggplant slices in a food processor and puree. The mixture will seem a little lumpy. Add the sesame tahini and lemon juice and continue to puree; the mixture smooth out.
  • Taste the dip and add salt as needed.
  • Serve with naan bread, pita bread, veggies, or anything else you could possibly dip in there! This can be served hot, room temperature, or cold.

In case you've never used sesame tahini before, this is what it looks like. It comes in a jar and it's pretty runny stuff; it's a pour-able liquid. You can find it in the Asian section of almost any grocery store. Tahini is a great ingredient to keep on hand. You can use it in marinades, salad dressings, and all kinds of dips.


Monday, May 19, 2014

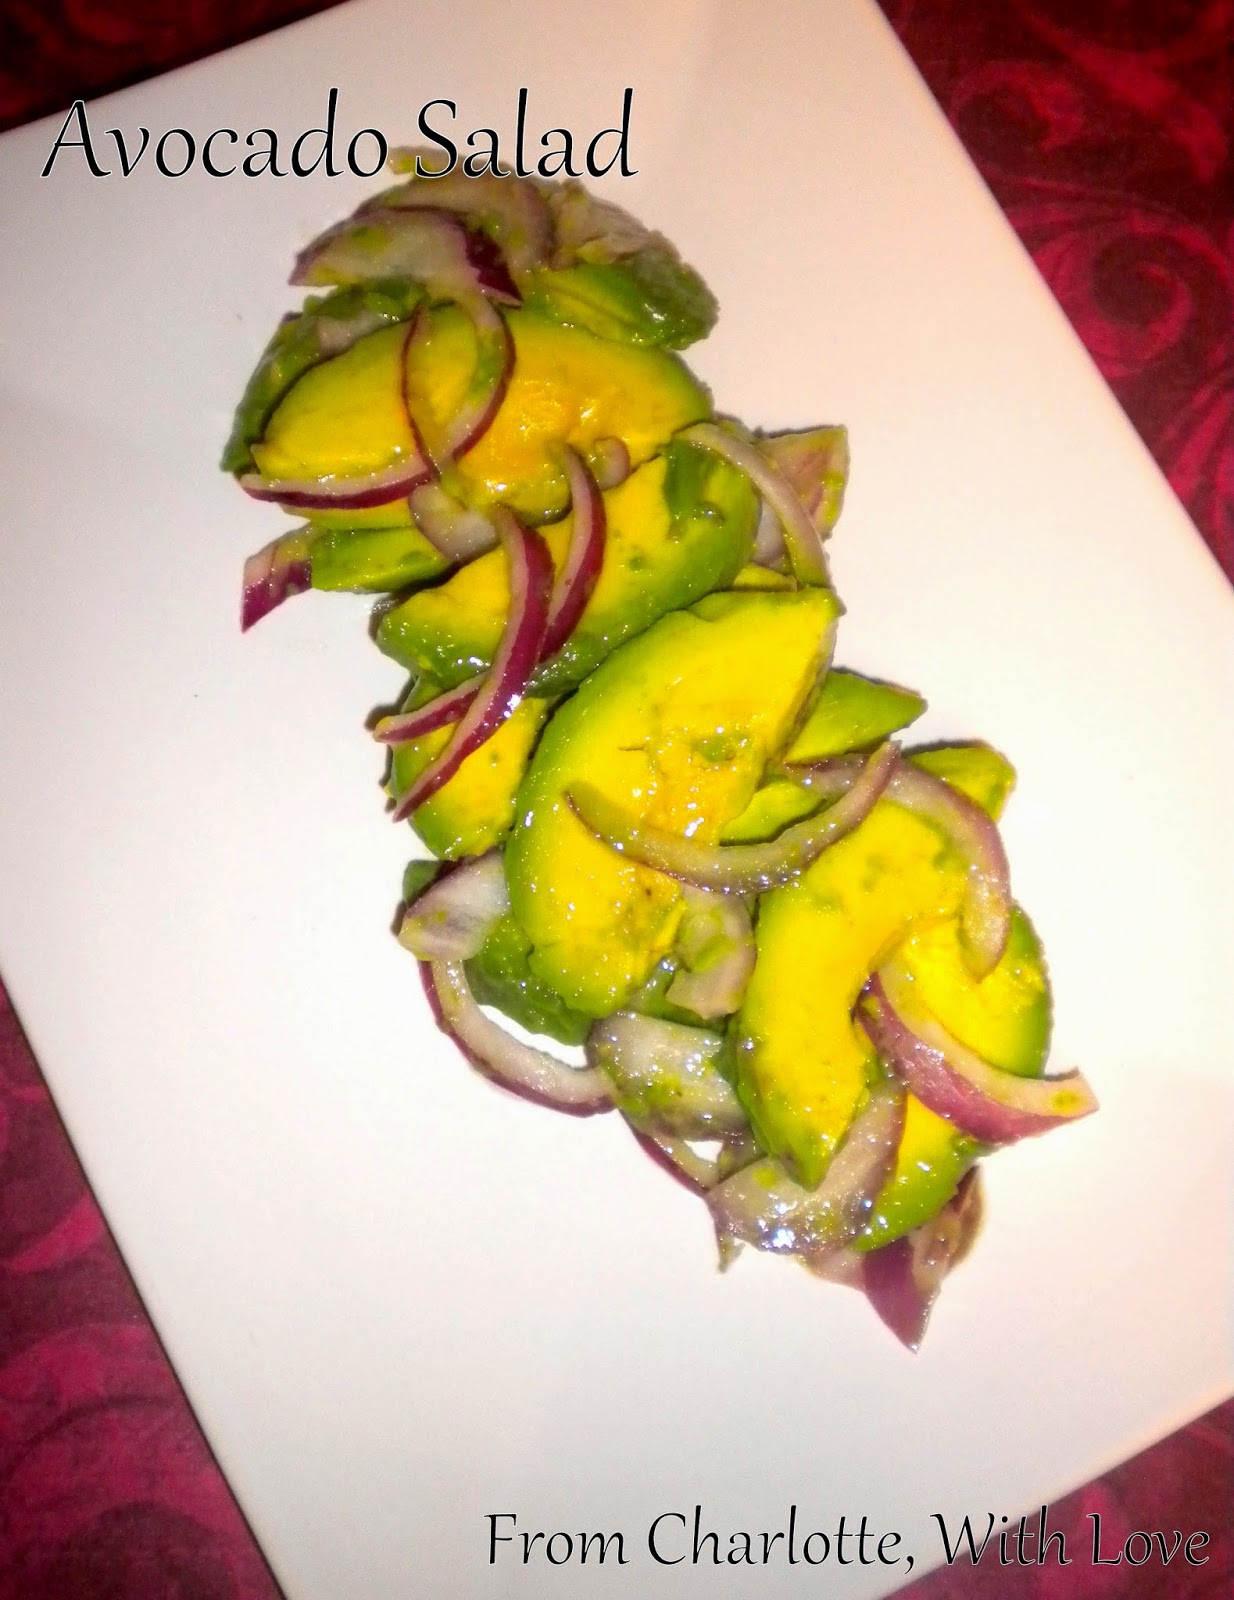
Avocado Salad

I actually got the recipe for avocado salad from my boss. She was eating it at work one day and it looked really good so I asked her about it. She told me she had it at a restaurant and it was so good she went home and recreated it. It's super simple but amazingly delicious. You can make a single serving for a light lunch or several servings as an appetizer for a get-together.

Avocado Salad
Makes: 1 serving

1 ripe avocado
3 - 4 paper thin slices of red onion
1 tbsp olive oil
1 tbsp lime juice
pinch sea salt
  • Cut the avocado in half and remove the pit. Cut each half into slices, then scoop them out of the shell. Place the slices in a glass bowl.
  • Add the onion, olive oil, lime juice, and sea salt. Gently fold it all together with a spoon or rubber spatula.
  • Serve on a bed of baby spinach, with some tortilla chips, or with a warm flour tortilla.

Monday, May 12, 2014

Loaded Sweet Potato Fries

I absolutely love sweet potato fries. I don't think there's anything better than a plate of sweet potato fries drizzled with some melted honey butter. Mmmmmm... Now, I know that sweet potatoes are really good for you and they have a lot of great vitamins and minerals. But, as the name suggests, this recipe is not meant to be health food haha! Don't say I didn't warn you! I had some left-over pulled pork so I loaded up my sweet potato fries with some of the left-overs. It was a match made in heaven!


Loaded Sweet Potato Fries
Makes: 4 servings

4 servings of sweet potato fries (that's 336g for those of you who use a food scale)
2 tsp honey
1 cup pulled pork
1/2 cup shredded Monterey jack cheese
  • Cook the sweet potato fries by either baking them or deep frying them. I prefer deep frying; it makes them come out lighter and fluffier.
  • Once the fries are cooked, pile them up on an oven safe plate. Then drizzle them with the honey.
  • If you're using fresh pulled pork, sprinkle it over the fries. If you're using left-overs, reheat it first, then sprinkle it on the fries.
  • Top the pulled pork with the shredded cheese. Place the fries under a broiler on high for about 2 minutes until the cheese is melted.
  • Dive in!

Pulled Pork

If you've never made pulled pork before, it's truly the easiest thing you can possibly make. Just get a medium sized pork shoulder (sometimes it's called a Boston Butt roast), about 6 - 8 lbs, dump a whole bottle of sauce over it, then cook it in a slow cooker on low for eight hours. It's most commonly made with barbecue sauce, but you could use any kind of sauce you want. You could even make your own. For this particular one, I used Lowry's chop and steak marinade. It was really good! Once the pork is cooked, remove the bones with some tongs. Then, using the same tongs, rip apart the roast and kind of stir it at the same time so that it's eventually shredded. You could also do this with a pair of forks if you like it finely shredded (like us!).

Friday, May 2, 2014

Bacon Cream Cheese Bites

I had some phyllo dough left over from my post about Spanakopita so I thought I would put it to good use. Phyllo is a traditional Greek pastry dough that is super thin, even thinner than paper. It folds really nicely into triangles and makes a great party appetizer. You can stuff pretty much anything in there as long as it doesn't have too much moisture. I think bacon and cream cheese fit the bill, don't you? ;-)

Bacon Cream Cheese Bites
Makes: 24 triangles

1/2 lb bacon, chopped
1/2 onion, finely diced
1 clove garlic, minced
3 scallions, chopped
4 oz (1/2 brick) cream cheese, softened
2 tbsp Parmesan cheese
1/4 cup shredded mozzarella cheese
1/4 cup shredded cheddar cheese
Pinch of salt
8 sheets of phyllo dough, thawed
1 tbsp butter, melted

  • In a skilled over medium-medium-high heat, brown the bacon until it is crispy. Remove the bacon from the pan and set aside. Reserve one tablespoon of the drippings.
  • In the same pan, cook the onions and garlic in the bacon drippings over medium-low heat until the onions are soft but not brown, about five to six minutes.
  • In a stand mixer, or with an electric hand mixer, on medium whip the cream cheese until it is light and fluffy, about two minutes.
  • Add the bacon, onion mixture, scallions, Parmesan cheese, mozzarella cheese, cheddar cheese, and salt. Continue to beat on medium until well mixed, about 30 seconds. Set the mixture aside.
  • Brush a large baking sheet with the melted butter.
  • Now you'll need to assemble the triangles. If you read the next few steps and you have no idea what I'm talking about, see my post about Spanakopita which includes photos.
  • Take one sheet of phyllo dough, use a barely damp paper towel to cover the rest so they don't dry out.
  • Cut the phyllo dough into thirds length-wise with a pizza cutter.
  • Place a small spoonful of the filling at the top and off to the right of one of the strips.
  • Now you'll need to start folding. You fold these like you would a flag. Grab the upper left corner and fold it down to the right so that you form a triangle at the top.
  • Now take the top right corner and fold it straight down.
  • Take the top right corner again and fold it down and over to the left.
  • Take the top left corner and fold it straight down.
  • Repeat until you get to the end and have a perfect triangle. Place it on the buttered baking sheet. Repeat with the remaining phyllo dough and filling.
  • If you're making these a day ahead, you can stop at this step, cover it up with plastic wrap, and refrigerate it. Then place it in the oven the next day about an hour before you're ready to serve.
  • Bake at 350° F for 30 minutes.


A few tips:
If you haven't invested in a spatter screen yet, I highly suggest it. They're relatively cheap and will save you from getting popped when you fry stuff such as bacon.

If you're not sure what to do with the rest of the bacon drippings, here's what I do. I line a bowl with aluminum foil then pour the drippings in. Once the drippings are cool, fold it up and chuck it in the trash!


Thursday, May 1, 2014

Spanakopita (Spinach Pie)

Spanakopita is a traditional Greek snack. The name translates to spinach pie in English. It's made out of layers of delicate flaky phyllo dough and a filling made out of spinach, feta, onions, and egg. Sometimes it is made as one large pie and then individual servings are cut. It can also be made into little individual servings by folding the phyllo dough into little triangles. I prefer the latter preparation. It looks really nice and it makes for great little finger food when you're hosting a special occasion.


Spanakopita
Makes: 30 triangles

10 sheets of phyllo dough, thawed
2 tbsp olive oil
1/2 onion, finely diced
4 scallions, chopped
2 cloves garlic, minced
18 oz (2 boxes) frozen chopped spinach, thawed
4 oz crumbled feta cheese
1/4 cup Parmesan cheese
1 egg, beaten
pinch of salt
1 tbsp butter, melted
  • Heat the olive oil in a skillet over medium-low heat. Add the onions, garlic, scallions, and a pinch of salt. Cook for 5 - 6 minutes until the onions are soft but not brown.
  • Transfer the onion mixture to a large mixing bowl. Set aside.
  • Take the thawed spinach and grab a small handful. Squeeze most of the moisture out of the spinach and then place it in the mixing bowl with the onion mixture. Repeat with the remaining spinach. This step sounds a little gross but it's very necessary. You'll be surprised how much liquid comes out and that liquid will make the spanakopita soggy if you skip this step.
  • Add the feta and Parmesan cheese to the spinach and onion mixture. Mix it all together. Taste the mixture to make sure it doesn't need any salt. Add some if necessary.
  • Once the seasoning has been adjusted, add the beaten egg to the spinach mixture.
  • Now that the filling is done, you can start assembling the triangles. This is the most time consuming part of making these. First, open your package of phyllo dough. Wet a paper towel then wring it out as much as you possibly can. You want it just barely wet. Use the damp paper towel to cover the rest of the phyllo dough while you're working with a sheet. This will prevent the dough from drying out and cracking.
  • Brush a baking sheet with the melted butter. Set aside.
  • Take one sheet of phyllo dough and cut it into thirds length-wise with a pizza cutter.
  • Place a small spoonful of filling at the top and off to the right of one of the strips.
  • Now you'll need to start folding. You fold these like you would a flag. I'll explain. Grab the upper left corner and fold it down to the right so that you form a triangle at the top.


  • Now take the top right corner and fold it straight down.


  • Take the top right corner again and fold it down and over to the left.
  • Take the top left corner and fold it straight down.


  • Repeat until you get to the end and have a perfect triangle. Place it on the buttered baking sheet. Repeat with the remaining phyllo dough and filling.
  • If you're making these a day ahead, you can stop at this step, cover it up with plastic wrap, and refrigerate it. Then place it in the oven the next day about an hour before you're ready to serve.
  • Bake at 350° F for 45 minutes. The tops will start to brown pretty quickly. But don't worry, they won't burn, I promise.
  • These are great served hot out of the oven or cooled to room temperature.

Tuesday, April 1, 2014

Queso Poblano

Matt and I love salsa con queso. Probably a little too much haha! I put that stuff on eggs, broccoli, roasted corn, grilled chicken, just about anything I can possibly think of! This is my own special version made with roasted poblano peppers. I love poblanos; they're a very mild pepper and have a great flavor.

This dip is made with American cheese. It's really important that you get the kind from the deli. The stuff that comes in individual wrapping is highly processed and won't work out in this recipe. Also note, this recipe calls for evaporated milk which is not the same thing as sweetened condensed milk. That would be a pretty awful surprise ha! So make sure you look at the label.

Queso Poblano
Makes: 10 servings

2 poblano peppers
1 lb American cheese
12 oz can evaporated milk
1 tsp onion powder
1 tsp garlic powder
1/2 tsp ground cumin


  • Roast the poblano peppers. Rinse them well then wipe them down so that they are completely dry. Place the peppers on a baking sheet then place them under the broiler as close as they can get. Roast for about 10 minutes per side until the skin is blistered and charred.
  • Once the peppers are roasted, place them in a bowl and cover with plastic wrap. Let them sit for at least 30 minutes.
  • Remove the peppers from the bowl, remove the stem and seeds, remove the charred skin, then dice the peppers into about 1/2" dice.


  • Mix together the cheese and evaporated milk in a medium sauce pan. Place the sauce pan over medium low heat and stir constantly until the cheese melts and the dip is thickened, about 10 minutes.
  • Remove from the heat, stir in the poblano peppers, garlic, onion, and cumin. The dip may seem a little bit thin but it will thicken quite a bit as it cools. If the dip gets too thick, just heat it up again.

Serve with tortilla chips, soft flour tortillas, and/or vegetables for dipping.

Friday, March 28, 2014

Deviled Eggs

As a precursor to my Easter Eggs post, I decided to give some step-by-step instructions on how to make the perfect hard boiled egg. It may seem counter intuitive, but you're not really supposed to boil them. I'll explain...

  1. Place up to a dozen eggs in the bottom of a sauce pan (I don't recommend doing more than a dozen at a time).
  2. Fill the pan with cold water to about one inch above the eggs.
  3. Cover and heat on high just until the water starts to boil.
  4. The moment the water starts to boil, remove the pan from the heat.
  5. Place the pan either on a cold burner or a trivet on the counter top.
  6. Let the eggs sit in the hot water, covered, for 10 minutes.
  7. After 10 minutes, drain the hot water.
  8. If you're going to eat the eggs hot, transfer the eggs to some cold water for about two minutes. This will make them cool enough to peel but they will still be hot in the middle.
  9. If you're going to eat the eggs cold such as deviled eggs or egg salad, transfer the eggs to a bowl filled with ice water for about 10 minutes. Then move the eggs to the refrigerator for at least one hour to completely cool.
This gentle cooking method will ensure that the eggs are perfectly cooked and you don't get that green ring around the yolks.

Ok, now that you know how to make the perfect hard boiled egg, here's my recipe for deviled eggs!

Deviled Eggs
Makes: 24 deviled eggs

1 dozen hard boiled eggs
1/2 cup mayonnaise
1 tbsp Dijon mustard
1 tsp onion powder
1 tsp garlic powder
1/2 tsp celery salt
paprika
  • Cut the eggs in half length-wise. Remove the yolks and place in a bowl. Set the whites aside.
  • Mash the egg yolks with a fork.
  • Gently mix in the mayonnaise, mustard, onion, garlic, and celery salt.
  • With a spoon or a piping bag, fill the egg whites with egg yolk filling.
  • Sprinkle the eggs with a little bit of paprika. You'll want to wait on this step until right before you serve the eggs. Otherwise the paprika will stain the egg whites a strange purple color. It doesn't change the flavor, it just looks a little weird.

Saturday, March 15, 2014

Crunchy Pepper Jack Cheese Sticks

So, I have to admit that this is not my own original idea. I found this recipe on Life's Ambrosia via Pinterest. I have to say that I have -ahem- improved upon the idea a bit! Matt and I are totally addicted to pepper jack cheese and this just fuels our addiction even more. I think I may need to start going to PJC Anonymous hehe!


Crunchy Pepper Jack Cheese Sticks
Makes: 8 cheese sticks

8 egg roll wrappers
8 oz brick of pepper jack cheese

Yep! Just two ingredients!


  • Preheat a deep fryer or heavy bottomed dutch oven filled with oil to 375° F.
  • Cut the brick of pepper jack cheese into 4 long slices lengthwise. Then turn each slice on it's side and cut in half so that you have 8 even sticks.
  • Freeze the sticks for one hour. This step is really important. Otherwise the cheese will ooze out into the hot oil and you'll have an empty wrapper.
  • Place a cheese stick diagonally on an egg roll wrapper. Then brush two of the edges with water.


  • Fold the wrapper in half over the cheese stick, then fold the small top and bottom flaps over like you would with a burrito.


  • Brush some water on the smaller triangle that was just folded over the cheese stick. Then continue to roll it up like an egg roll.
  • Now fry the cheese sticks until golden brown, about 3 minutes.
  • Dip in marinara or sweet chili sauce.

Thursday, March 13, 2014

Southern Fried Pickles

My sister-in-law, Erica is a true southern gal; born and raised in North Carolina. If you live around here, you'll know how rare it is to meet someone who is actually originally from North Carolina. Erica is a self described "terrible cook." However, I beg to differ. She has taught me a lot about southern cooking and tradition. Her Southern Fried Pickles are to die for! She has informed me that all southern women have their own recipe for breading and it's a heavily guarded secret. So consider yourselves lucky that she has decided to share her secret with us!


Southern Fried Pickles
Yield: 4 servings

16 oz jar of dill pickles
1 cup flour
1/3 cup plain bread crumbs
2 tsp seasoned salt
1/2 tsp onion powder
1/2 tsp garlic powder
1 tsp cayenne powder
2 eggs
1/4 cup milk

  • Preheat a deep fryer or heavy bottomed dutch oven filled with 1" of oil to 375° F.
  • Drain the jar of pickles but do not rinse them.
  • Combine the flour, bread crumbs, seasoned salt, onion, garlic, and cayenne. Set aside.
  • Whip together the eggs and milk.
  • Soak the pickles in the egg mixture for 1 minute.
  • Toss the pickles in the flour and bread crumb mixture then shake off any excess.
  • Fry the pickles until golden brown, about 2 - 3 minutes.
  • Serve with ranch - we mixed a little sriracha sauce into our ranch!
Note: The first time I ever made these, I made the grave mistake of getting bread and butter pickles. It was terrible. I don't know how much more I can say about this other than, "just don't." Make sure to get dill pickles.

And in case you didn't think I was completely insane yet... This post has inspired the name of Erica's new puppy - Simon James Alexander Ragsdale Picklesworth III M.D. but you can just call him Professor Pickles for short.

Saturday, March 8, 2014

Zucchini Fries

I absolutely love zucchini. I'll eat it any way you could possibly make it. The same goes for Lola. One of my favorite ways to eat zucchini is zucchini fries. This is actually something that my mom made when I was growing up. Of course, back then we had never heard of panko; I'm not sure if it was even available here in the states. So she just made them with regular bread crumbs. I really like the panko though, it makes them super crunchy.


Zucchini Fries
Makes: 4 servings

2 large zucchinis
1 1/2 cups panko bread crumbs
1 tsp Italian seasoning
1 clove garlic, finely minced
pinch salt
1/2 cup flour
2 eggs
2 tbsp milk


  • Combine the panko, Italian seasoning, garlic, and salt. Set aside.
  • Whip together the eggs and milk. Set aside.
  • Wash the zucchini well. Cut off the ends, then cut the zucchini in half.

  • Then cut each section into four slices.

  • Then cut each slice into four sticks.

  • Grab 8 - 10 sticks at a time. Dip them in the flour, then the eggs, then the panko.
  • Place the zucchini fries on a lightly greased baking sheet in a single layer, leaving some room between each fry.
  • Once all of the fries have been placed on the baking sheet, lightly spray them with some cooking spray. This will help ensure that they brown well.
  • Bake at 425° F for 15 minutes.
  • Serve with dipping sauce such as ranch, sweet chili, or even marinara.
    Lola approves!

Friday, March 7, 2014

Cheesecake Factory Copy-Cat: Buffalo Chicken Blasts

Matt and I love the Cheesecake Factory. The last time we went there, I had the best filet mignon I've ever had in my life! Anyhow, they have an appetizer there called Buffalo Chicken Blasts. It's basically wontons filled with buffalo chicken and then chicken fried. Does it get any better than that?! This is my second attempt at a copy-cat recipe for these and I think I've gotten pretty close. Let me know what you think!

Buffalo Chicken Blasts
Makes: 16 pieces

2 cups cooked, chopped chicken
4 oz cream cheese (1/2 brick), softened
1/4 cup hot sauce (such as Frank's)
1/3 cup shredded cheddar cheese
16 egg roll wrappers
2 eggs
2 tbsp milk
1 1/2 cups flour
1/2 tsp garlic powder
1/2 tsp onion powder
1 tsp parsley
1 tsp dill
1/2 tsp sea salt
1/4 tsp cracked black pepper

  • Preheat a deep fryer or heavy bottomed dutch oven filled with oil to 375° F.
  • Combine the chicken, cream cheese, hot sauce, and cheddar cheese. Note: I used a rotisserie chicken for this. If you don't want to use a rotisserie chicken, you could bake two chicken breasts at 400° F for 20 - 25 minutes, then chop up. The chicken mixture will kind of look like a sticky mess at this point. That's ok, don't worry.

  •  Make the egg wash by beating together the eggs and milk. Set aside.
  • Mix the flour, garlic, onion, parsley, dill, salt, and pepper. Set aside.
  • With a pastry brush, brush two sides of the egg roll wrapper with water (these are usually found in the produce section next to the tofu). Then fill the wrapper with two tablespoons of chicken mixture, about the size of a golf ball.
  • Fold over the egg roll wrapper to form a triangle and seal the edges, making sure to press out any air from inside the wrapper.
  • Dip the triangle in the egg wash, then the flour. Shake off any excess flour.
First batch is ready to go!
  • Deep fry the triangles for two minutes on each side. My deep fryer can only fit two at a time.

  • Once cooked, drain off any excess oil by placing the triangle on a cooling rack on top of a baking sheet. Like so:
  • Allow to cool for a few minutes. The filling will be hotter than the blazes of hell and damnation. Don't say I didn't warn you.
Note: You can make a smaller version by using wonton wrappers instead of egg roll wrappers. This would make a great party appetizer.

Sunday, March 17, 2013

Bacon Wrapped Chicken Bites

If you haven't given up on your New Year's resolution yet, you might want to avert your eyes. This isn't even close to health food. I got my inspiration from a Paula Deen recipe. As much as it pains me to say anything bad about Paula Deen, I had to make some improvements on her recipe. The chicken came out dry and the bacon was chewy. Here's my version with some changes to the cooking method:


Bacon Wrapped Chicken Bites
2 boneless skinless chicken breasts, cubed
1 Pound bacon
1/2 Cup brown sugar
1/2 Tsp cayenne pepper
  • Cut the package of bacon into thirds. Place the bacon on a parchment lined baking sheet and bake at 375° F for 10 minutes until cooked about half way. (This method of partially cooking an ingredient is called par-cooking and will ensure that the bacon finishes cooking at the same time as the chicken). 
  • While the bacon is cooking, mix together the brown sugar and cayenne pepper then set aside.
  • Remove the bacon from the oven and increase the heat to 400° F.
  • Once the bacon has cooled enough to touch, wrap the bacon around a piece of chicken, secure the bacon with a tooth pick, then toss in the brown sugar mixture.
  • Place the chicken bites on a parchment lined baking sheet. Bake for 20 minutes.